When I started out mountain biking, I knew I needed a helmet to keep the head and the brain protected. But that’s about as much as I knew! I was overwhelmed by the number of types of mountain bike helmets and the many technical terms.
We have made this simplified guide on how to choose a mountain bike helmet, emphasising what is important to know now, and what can be learnt later.
To start with, we will have a look at what makes a good MTB helmet in the first place. There are a lot of technical terms thrown about, with little understanding of what they actually mean. For example, many helmets advertise an ‘EPS Liner/Inner’ and a Polycarbonate shell. But what are these, and are they right for you?
What Makes a Good MTB Helmet?
The whole idea of a mountain biking helmet is to protect your head after a crash. It needs to minimize the impact so that your head does not suffer any physical impact or a brain injury.
However, since the majority of the time you won’t be crashing (hopefully), a good helmet should also be comfortable for riding.
Protection (Important)
So what suffices as good protection? Modern helmets are typically made of three components- the outer shell, foam (which makes the bulk of the helmet) and the inner liner.
Outer Shell
The outer shell, the plastic outer material that you see, has two main functions:
- To help stop sharp objects from penetrating through the helmet,
- To allow your head to skid safely across the ground surface without bending your neck (given no objects are in the way).
What to look for?
- Polycarbonate plastic is by far the most dominant mountain bike helmet material on the market. It is a very tough, lightweight, durable material so very commonly used on helmets.
- ABS (or Acrylonitrile Butadiene Styrene) is another commonly used plastic, very similar properties to the Polycarbonate, but slightly heavier. Still an excellent option, and usually slightly cheaper.
- Carbon Fibre is more commonly used on full-face mountain bike helmets. It is still reasonably lightweight and has very high protective capabilities.
Foam
The foam layer is the 0.4-0.8 inches of foam beneath the outer shell, which forms the bulk of the bike helmet. Basic physics states that a force will be dissipated more if the duration of the impact is longer. The foam layer crushes on impact, increasing the stopping time, which significantly reduces the severity of the impact.
The ideal foam is light, breathable, yet substantial enough to reduce the force transferred to your head.
What to look for?
- EPS (Expanded Polystyrene): You will typically come across EPS foam in mountain bike helmets. It is the most common material making up the bulk of the helmet. It dissipates the energy from an impact exceptionally well and is relatively inexpensive to form the internal of a helmet. However, it is only suitable for one crash. This is the reason experts recommend replacing your helmet after a single impact.
- EPP (Expanded PolyPropolyne): A softer foam than EPS, which is great at absorbing the impact from slower crashes. Often used with EPS (which absorbs energy from higher speed crashes) so that all bases are covered! This is more common in higher end and full face helmets.
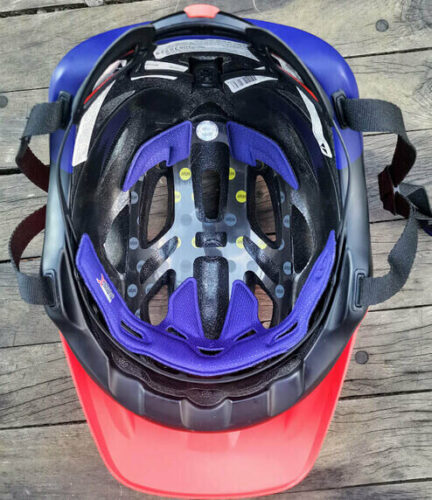
Inner Liner

The inner liner is the slight cushioning that separates your head from the foam. It also tightens the helmet around your head, so you get the right fit.
The cushioning can make a big difference to the comfort and ventilation of your helmet. Too much cushioning and you will just get super sweaty (although some have sweat guides to direct the sweat away from your eyes- such as in the photo above). Not enough cushioning and you get a pretty uncomfortable helmet! Some helmets have an inner liner that keep the helmet slightly off your head for better ventilation.
The inner liner also can include anti-rotational systems (such as MIPS, which is one of the more common systems).
Anti-Rotational Systems (Important)
An anti-rotational system is one that reduces the rotational movement of your brain during a crash. It is the rotational movement that is said to cause brain damage during a collision. Many anti-rotational systems have appeared on the market in recent years, and the sheer number of these can be overwhelming for someone looking for improved protection. Below we have explained the more conventional systems.
What to look for?
- MIPS: Multidirectional Impact Protection System is a layer that sits against your head, and can move separately to the foam layer. The MIPS component allows the outer part of the helmet to move during a crash without rotating your head. This means that during an angled crash, there is less rotational movement transferred to your brain.
- SPIN (by POC): Spin pads are placed in specific locations inside the helmet. These are strategically placed to prevent injury from rotational impacts by shearing in any direction. SPIN stands for Shearing Pads Inside. The pads are constructed of highly protective medical-grade silicone, and very comfortable.
- 360 Turbine (by Leatt): These are disc-shaped pads that harden on impact. They act to dissipate rotational direct and deflective impact energy. The discs are placed strategically within the helmet to protect temples and vulnerable parts of the head. The turbines are non-Newtonian turbines that spin and deform to absorb energy.
- WaveCel: Wave cell supplements the EPS layer of the bike helmet. They are effectively a grid of waves that offer protection from angular crashes. Supposedly better than MIPS at reducing speed, and hence the severity of the impact. However, proving this scientifically is very difficult.
- Koroyd: In simple terms, Koroyd is made up of many small collapsible thin-walled tubes that are welded together to form a lightweight, breathable core of the mountain bike helmet. It effectively looks like thousands of small straws put together. This makes a large crumple zone and reduces the rotational movement of the head.
But which is better?
MIPS, SPIN, and 360 Turbine have very similar approaches to reducing rotational movement. They achieve this by adding a liner to the existing EPS layer and are all very effective options for protection.
WaveCel and Koroyd take a different approach, by integrating the EPS layer with the anti-rotational systems. This is to make it lighter and to have supposedly better crumple zones, which you do pay slightly more for.
Check out our pick of the best MTB helmets with MIPS.
Each system claims they are better than the other. But there has been little hard evidence into which the system is more effective. However, each system does have to meet certain standards so you can rest assured you are in good hands!
Comfort
You will be wearing the helmet for every mile of every ride, so you want it to be comfortable. A comfortable helmet is one that is lightweight, well ventilated, and fits the head snugly. It must do so without compromising on safety in any way. It can’t move around on your head if you give it a violent shake.
The best way to know if it is comfortable is obviously trying it on! But if that isn’t possible, read a few reviews and you will get the idea!
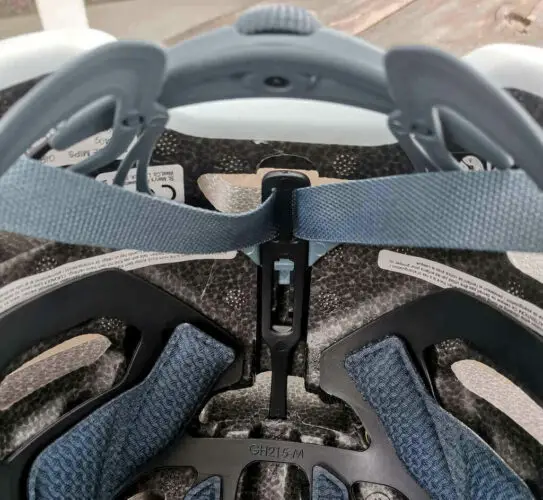
Adjustable Sizing
Most mountain bike helmets will have an adjustment dial on the back of the helmet. This allows you to tighten the helmet around your head in small increments. A higher-quality helmet will have a higher quality dial which tightens the helmet evenly around your head- rather than just tightening at the back.
Many modern cycling helmets have ’tilt adjusters’. These have many names, but they essentially change the position of the helmet on your head by rotating the shell of the helmet further towards or away from your forehead while keeping the MIPS liner, or the retention system where it was.
I have to admit- I have had this on a few helmets of mine- and I have yet to use it! While it may come in handy for some people, I wouldn’t class it as an essential item in a helmet!
Ventilation (Need to know)
Having good ventilation enhances wind flow between the helmet and your head, keeping you cooler and hence more comfortable. The best way to know if it is a well-ventilated helmet (besides actually taking it for a ride) is to check out reviews online.
It is hard to tell in store based on the number of helmet vents- as more vents don’t necessarily correlate to better ventilation! Check out our best-ventilated helmets here!
Or… if you live somewhere cooler, then you might want a warmer helmet. If so, check out our best winter mountain bike helmets.
Visor (Need to know)
Most mountain bike helmets will come with a visor to shield your eyes from the sun while shredding in the park. Having the sun in your eyes, particularly if you are heading through trees and get a flash of sun every few moments will never be comfortable!
When choosing a mountain bike helmet, the only thing you really need to consider about visors is if you need one that is adjustable or not. Cheaper helmets tend to have a visor that is fixed in one position (typically a removable visor). This is generally placed so it doesn’t get in your field of vision when descending, but it does tend to get in the way while climbing.
An adjustable visor is crucial for me. I find the ability to move the visor down to block the sun essential and to lift the visor out of the way while climbing. There is also the advantage of some helmets to be able to store goggles and glasses below the visor when you aren’t wearing them.
For more on visors, check out our deep dive into MTB helmet visors.
Additional Features
Moreover, there are some additional features you may want to consider.
Goggle Compatibility: Some mountain bike helmets offer goggle compatibility. This gives you a space on the helmet to rest your goggles without them slipping off. Particularly useful if you choose to take the goggles off to ride certain sections and want them resting upon the helmet.
Camera or Light mount: Some helmets have a design that allows you to mount a light or camera to allow you to capture your riding. If you do happen to crash, a helmet with an integrated camera mount will break away, preventing you from hurting your neck/head. Having a light mount is particularly handy if you want to do any riding in the dark.
If you are looking for mountain bike helmets with built-in camera mounts, check out our top 8 picks.
Chin Bar: The chin bar is a feature on Downhill helmets. It provides more protection for the front of the face and chin in case of a crash. The chin guard can be removable on some helmets, reducing the weight for uphill climbs and easily re-attachable for the downhill section.
I highly recommend my Bell Super Air R (image shown below), which is light, comfortable, breathable, and you get two helmets for the price of one! See my review on the Bell Super Air R here, or check out our top picks for convertible helmets.
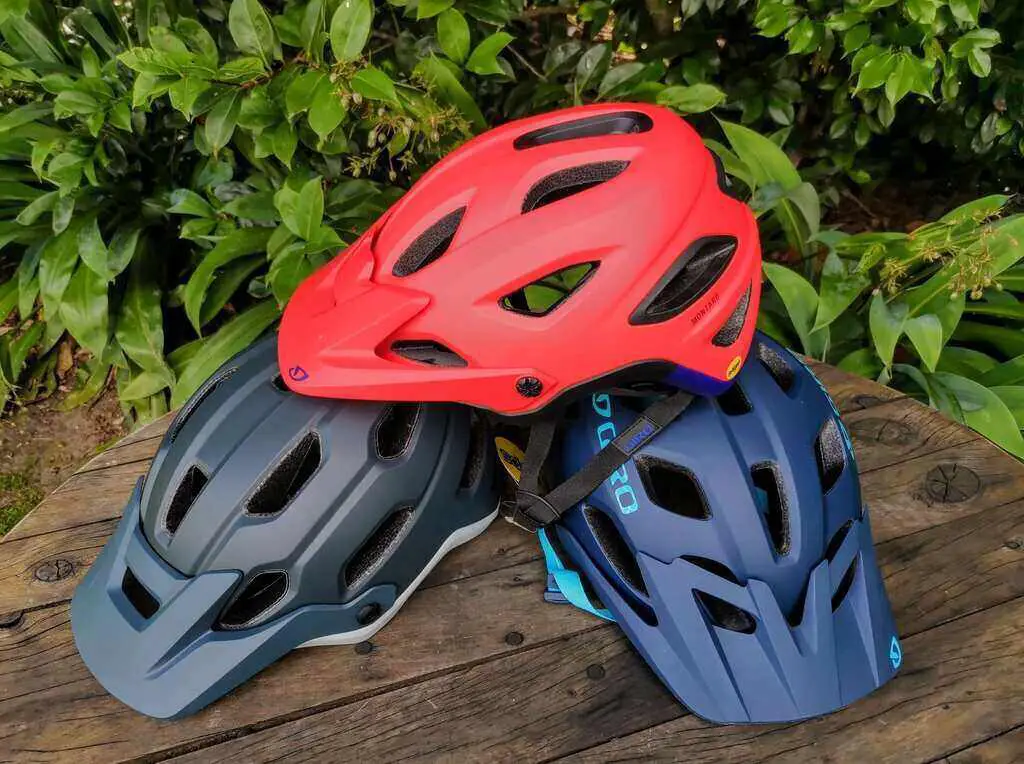
Types of Mountain Bike Helmets
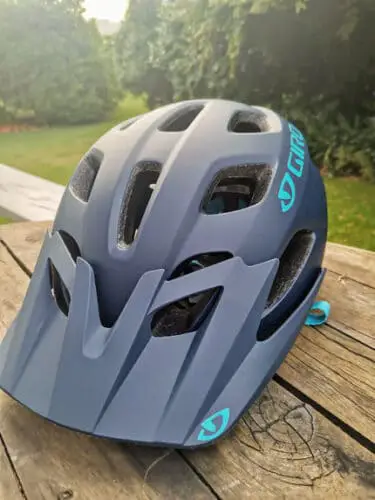
Half-Shell
Half-shell helmets (otherwise known as an open face helmet) is the standard helmet you will see out on the trails.
A half shell helmet is the lightest, most breathable style of helmet as the face area isn’t covered. It still provides excellent protection for the back and top of the head, but won’t cover the sides of your face or protect your chin or face in a head on collision.
Typicaly used by trail riders, enduro riders, through to commuters and your everyday kind of rider.
Full Face
A full face helmet, as the name suggests, protects the face as well as a bit more of the back of the head.
They are significantly less ventilated than your standard half shell, leaving you very hot and sweaty if you choose to climb a long section in the full face. These are much more common to be worn by those getting shuttled or taking a chairlift to the top of the mountain!
Common for enduro riders and downhill riders to be wearing this kind of protection. But they are also becoming more and more common for trail riders to be wearing full face as the helmets get lighter and better ventilated.
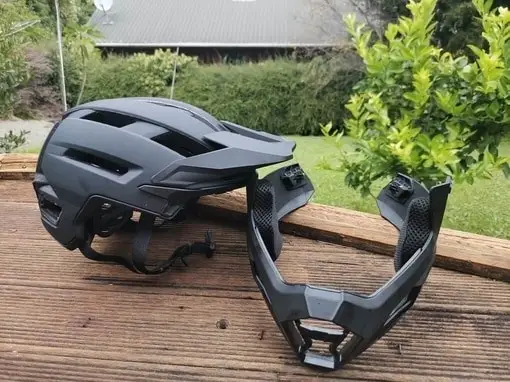
Convertible (or detatchable)
Convertible or detatchable helmets are half shell helmets that have a chin bar portion available for you to attach when needed. I can not stress how handy these helmets are! You can ride to the park, or to the top of the hill wearing a half shell. Then before you begin the descent, attach the chin bar!
They generally cost about the same as a downhill helmet, but you get two helmets for the price of one!
Can I use a non-mountain bike helmet?
The short answer is no. But, I understand the dilemma- you have a perfectly good ski, or motor bike, or horse riding, or road cycling helmet in the garage, so why not just use that and save yourself a bit of money?
The thing is, is that helmets are actually a lot more complex than you might imagine. Mountain bike helmets have been specifically designed to mitigate forces from mountain biking incidents. This means the shape of the helmet, the density of the foam, the anti-rotational liners, the positioning of the straps- are all designed specifically for mountain biking.
You may think- but surely my moto helmet is more protective right? A moto helmet is designed for crashes at high speeds- much faster than a mountian bike crash- so the foam density is much higher. This means at lower speeds, the foam wont deform, and you may as well hit your head on a rock.
A ski helmet, road cycling helmet or a horse riding helmet dont have as much coverage of the head, and just generally aren’t designed for awkward encounters with rough terrain.
Not to mention, a mountain bike helmet will be a heck of a lot more comfortable! For only a fraction of the price of your bike, why not invest in something that will make riding more enjoyable, and keep you safe!
How to choose the right helmet for you?
The type of helmet you need will be determined by how often you ride, and what you ride. If you ride often (upwards of a few times per month) you will want to invest in a good quality helmet.
As with most things, the quality of the helmet is determined by cost. How much you pay for a helmet will depend on how often
In terms of cost, you will pay more for:
- greater protection
- lightweight materials
- good ventilation
- stronger materials and construction
- style
- comfortable fit
- and additional features.
Decide which of these factors will be more important to you and work from there.
Your riding style and what you ride dictates the amount of protection, level of comfort, and additional features you will be requiring. For example, someone riding a short, flat gravel trail is requiring less protection and additional features but may desire greater comfort than someone riding advanced downhill trails.
If you want to find out more about when to replace a bike helmet, check out our guide here.
If you need more help in deciding which style of helmet to look for, see here: What are the different types of Mountain Bike Helmets.